Introduction to Dataviews
Creating a Dataview for an employee directory
This example lesson will introduce Dataviews in LiveCode Create and explain how they optimize data management. By the end of this, you will have a functional Employee Directory that displays a filtered list of employees from a collection.
What You Will Build
In this lesson, you will:
- Create a Collection to store raw employee data.
- Build a Dataview to efficiently retrieve and display relevant records.
- Set up Filtering Placeholders for refining results.
- Bind a Simple List widget to a Dataview.
- Create workflows to filter data using dropdowns and a search field.
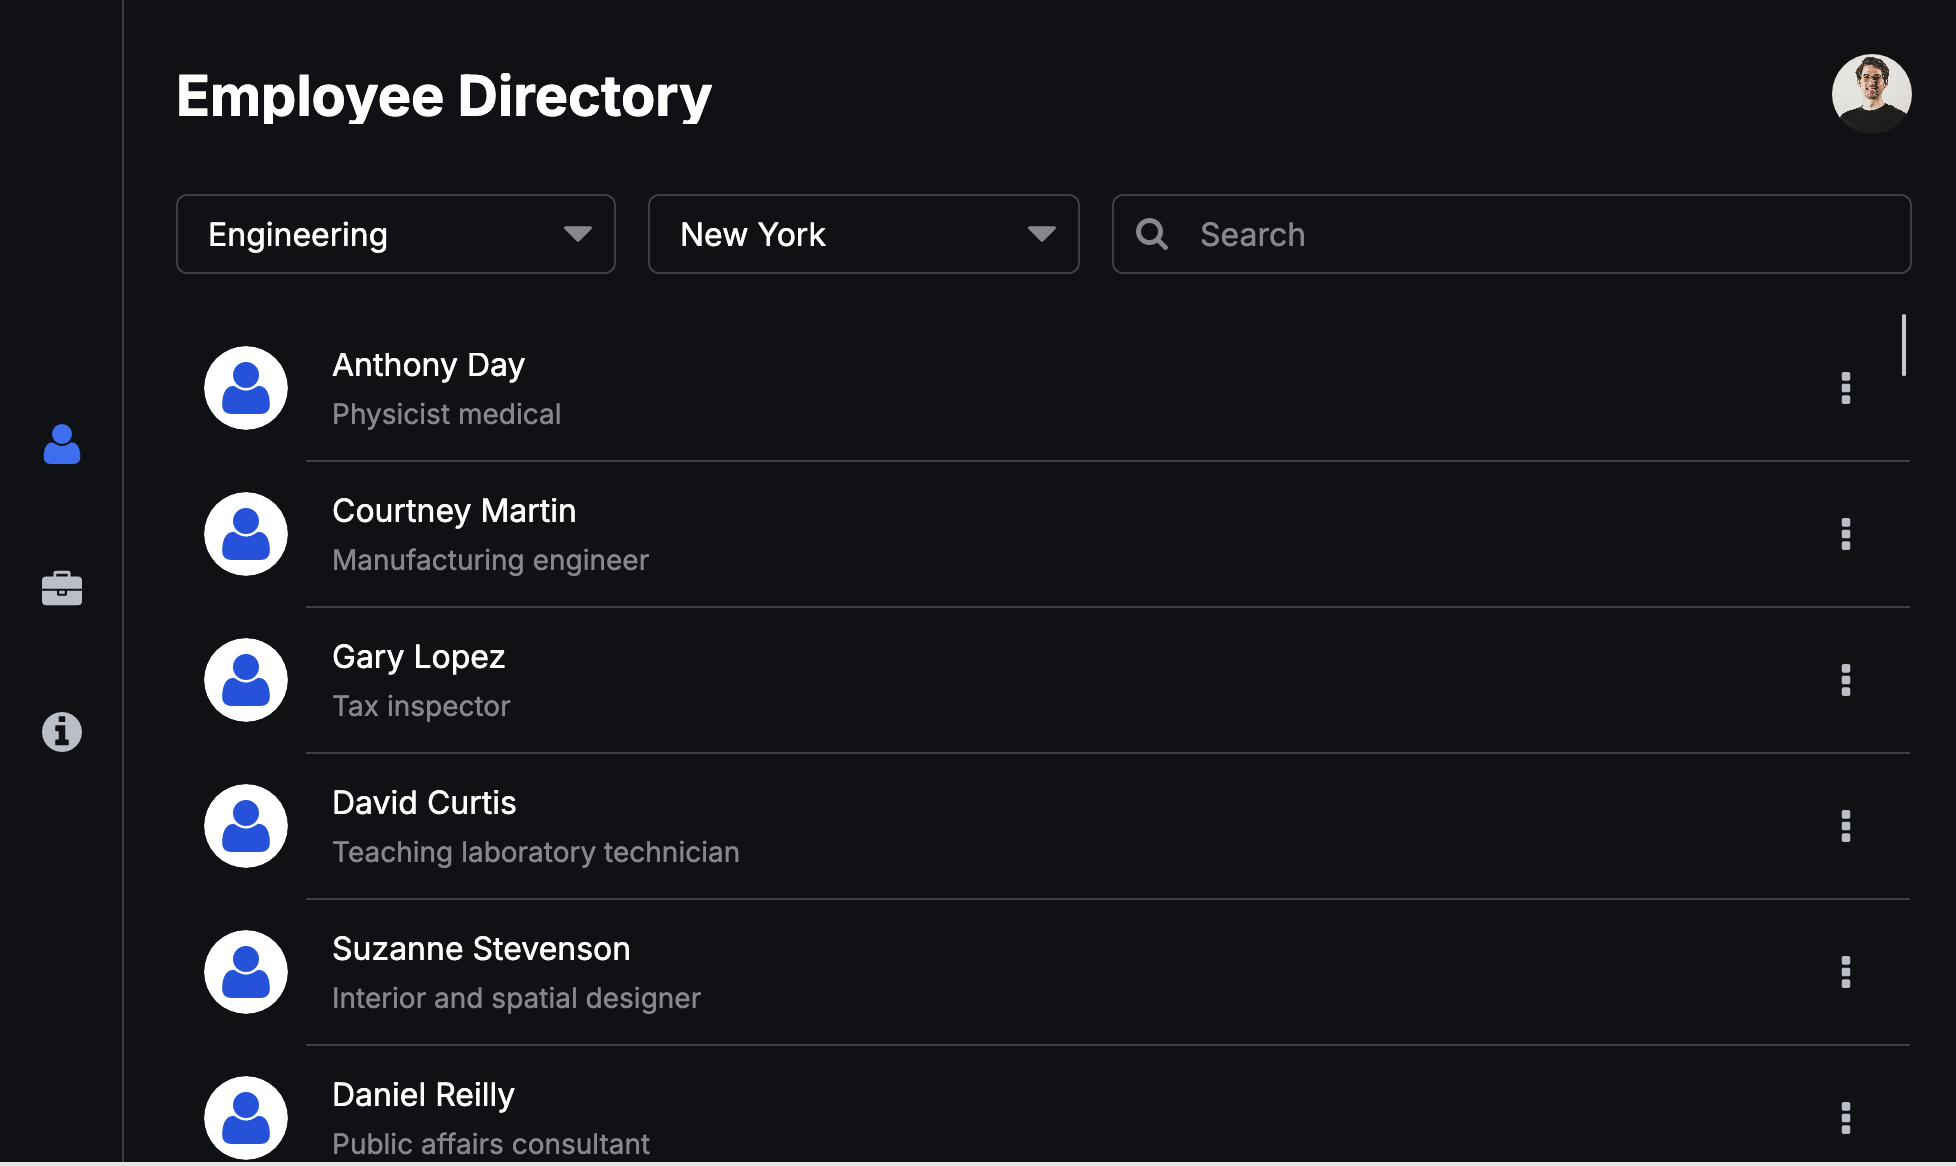
Here is a screenshot of the UI shown in the video. You can use this as a reference when following this guide.
Step 1: Creating the Employee Collection
Before working with a Dataview, we need a Collection to store employee data. If you would like to use the same data set as used in this example, download the CSV file here.
- Open the Data Section from the left-hand panel.
- Click New Collection.
- Name the collection Employees.
- Choose Build from CSV and select your dataset. (You can manually define fields if you prefer.)
- Review the imported fields and ensure they include:
- Employee Name (Text)
- Job Title (Text)
- Department (Text)
- Office (Text)
- Click Proceed.
Your Employees Collection is now ready.
Step 2: Creating a Dataview
A Dataview allows your app to retrieve only the necessary data, improving performance.
- Open the Data Section and switch to the Dataviews tab.
- Click New Dataview.
- Name the Dataview Employee List View and click Continue.
- Select Employees as the Default Collection.
- Choose the fields you want to include:
- Employee Name
- Job Title
- Department
- Office
Step 3: Adding Filtering Placeholders
To filter data dynamically, we need placeholders.
- Scroll down to the Filter section.
- Click Create New Filter and configure:
- Placeholder Name:
Department - Field:
Department - Operator:
Exact Match
- Placeholder Name:
- Click Create New Filter again:
- Placeholder Name:
Office - Field:
Office - Operator:
Exact Match
- Placeholder Name:
- Click Create New Filter again:
- Placeholder Name:
Search - Field:
Employee Name - Operator:
Contains - Add Another Condition with the + button:
Job Title(Contains)
- Placeholder Name:
- Scroll down and create a Sorting Rule:
- Sorting Name:
Sort Name - Field:
Employee Name
- Sorting Name:
- Click Save Dataview.
Step 4: Binding Data to the User Interface
Now that the Dataview is set up, we will bind it to a Simple List.
- Navigate back to your project UI by clicking on the Tools Palette icon in the left bar.
- Drag a Simple List onto the layout.
- Open the Property Inspector and navigate to the Data Binding tab at the top of the Inspector.
- Click Select Data Source and choose Employee List View.
- Set the Title field to Employee Name.
- Set the Subtitle field to Job Title.
Your list will now display all employees from the Dataview.
Step 5: Adding UI Controls for Filtering
We will now add dropdowns and a search field to filter the list.
Adding the Department Dropdown
- Drag a Dropdown onto the layout.
- Rename it to Department Dropdown in the property inspector
- Change the label to Department
- Manually enter the following options into the menu elements section of Dropdown contents.
- Engineering
- Finance
- HR
- IT
- Legal
- Marketing
- Operations
- Sales
Adding the Office Dropdown
- Drag another Dropdown onto the layout.
- Rename it to Office Dropdown.
- Change the label to Office
- Manually enter the following options:
- Austin
- Berlin
- Edinburgh
- London
- New York
- San Francisco
- Seattle
- Tokyo
Adding the Search Field
- Drag an Input Field onto the layout.
- Rename it to Search.
- Change the label to Search
Step 6: Creating Workflows for Filtering
Department Dropdown Filter
- Right-click the Department Dropdown and select Edit Actions.
- Click New Workflow and name it
Department Dropdown. - Set the trigger to Menu Pick.
- In the Actions Panel, drag out Filter Dataview.
- Configure the action:
- Dataview:
Employee List View - Filter Name:
Department - Value:
Fetch the text value of widget→ Select Department Dropdown
- Dataview:
- Add another action: Refresh Dataview.
- Click Save Workflow.
- Click Close Workflow Editor to return to your layout.
Office Dropdown Filter
- Right-click the Office Dropdown and select Edit Actions.
- Create a New Workflow named
Office Dropdown. - Set the trigger to Menu Pick.
- Drag out Filter Dataview. and configure:
- Dataview:
Employee List View - Filter Name:
Office - Value:
Fetch the text value of widget→ Select Office Dropdown
- Dataview:
- Add Refresh Dataview action.
- Click Save Workflow.
- Click Close Workflow Editor to return to your layout.
Search Field Filter
- Right-click the Search field and select Edit Actions.
- Create a New Workflow named
Search Employees. - Set the trigger to Text Change.
- Drag out Filter Dataview and configure:
- Dataview:
Employee List View - Filter Name:
Search - Value:
Fetch the text value of widget→ Select Search
- Dataview:
- Add Refresh Dataview action.
- Click Save Workflow.
- Click Close Workflow Editor to return to your layout.
Step 7: Adding Sorting and Reset Functionality
Sorting the List
- Drag a Button onto the layout.
- Resize it to 40x40 px.
- Uncheck Show Label.
- Enable Show Icon and select a Sort icon.
- Right-click the button and select Edit Actions.
- Set the trigger to Click.
- Create a New Workflow named
Sort List. - Drag out Sort Dataview and configure:
- Dataview:
Employee List View - Sort Name:
Sort Name - Order:
Ascending
- Dataview:
- Add Refresh Dataview action.
- Click Save Workflow.
- Click Close Workflow Editor to return to your layout.
Resetting the Filters
- Drag another Button onto the layout.
- Resize it to 40x40 px.
- Uncheck Show Label.
- Enable Show Icon and select a Refresh icon.
- Right-click the button and select Edit Actions.
- Set the trigger to Click.
- Create a New Workflow named
Reset Dataview. - Drag out Reset Dataview and choose Employee List View.
- Add Refresh Dataview action.
- Click Save Workflow.
- Click Close Workflow Editor to return to your layout.
Step 8: Testing Your Filters
- Switch to Run Mode.
- Select a Department from the dropdown.
- The list should filter to show only employees in that department.
- Select an Office—the list should refine further.
- Type in the Search Field—the list should filter by name or job title.
- Click Sort List—the list should reorder alphabetically.
- Click Reset Dataview—all filters should clear.
Conclusion
You have successfully created a Dataview, bound it to a Simple List, and added filtering, sorting, and reset functionality.
For further learning: